DIY Home Decor Categories

The Best (and Worst) Rooms for Hardwood Flooring

Compare Hardwood Flooring | Discount Wood Floors

Yes, hardwood flooring looks chic, elegant and gives your home a royal look. But, no hardwood flooring is NOT a cure-all to increase property value. While hardwood flooring does look amazing, lasts for decades and needs little maintenance, it is not suitable for all rooms. There are certain areas in your home where hardwood installation may not be ideal. Read on to know which are the best and the worst rooms for hardwood flooring before you invest your savings in renovating your flooring.

compare hardwood flooring

Rooms You Can Install Hardwood

Living room

The living room is the most lived in a room in any house. This is the space where you meet and entertain guests. It is also that room of the house that reflects your taste, style, and personality. Do not hesitate to install hardwood floors in your living room. Hardwood can withstand heavy traffic and soak in an occasional spill without sustaining damage if promptly cleaned. You may place a doormat at the doorway to trap moisture and dirt that visitors may carry into your house.

Home office space

If you work from home, it is a good idea to install hardwood in your home office space as it is said that it can generate positivity and boosts productivity.

Master suite

Whether you want to give your master suite an elegant look or add a touch of romance, you can do so by installing hardwood. Throw in a matching rug, and restrict the amount of light that enters the room by using thick drapes, and your bedroom will be transformed into a cozy haven. The floor too will remain in immaculate condition for years to come.

Rooms You Should not Install Hardwood

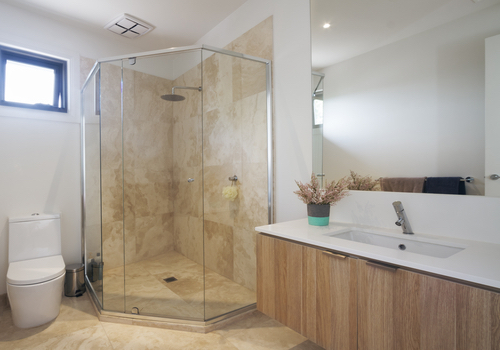
Bathroom: Water is the biggest enemy of hardwood floors. The moisture and wetness will destroy the flooring before you know it. And, if you have kids, imagine potty training them in a bathroom with hardwood flooring. This spells out disaster for your hardwood flooring. Your bathroom is a big No for hardwood flooring.

Laundry room: Hardwood horror again. Your laundry room is another room in your home where there can be leaks, water puddles, and detergent spills. Unless you never hang clothes to dry or throw wet towels in, it is best you steer clear from installing hardwood in this room.

Whether you are on the lookout for solid hardwood or engineered hardwood floors, simply shop at Flooring – your one stop destination for laminate, flooring and other accessories.

Decorate every room! (MORE new collectibles and home decor)

Back in February we did a blog post called A cool new thing for each room of the house and we have so many more new items, we thought we’d do it again today.

Primitive Dolls

Kerri

HAM-E14660-Kerri-LRG

Unique collectibles

Chalkboard tags

HAM-E14880-Chalkboard-Wooden-Tag-LRG

Galvanized lazy susan organizer

PKD-21-069-Galvanized-Lazy-Susan-Organizer-LRG

Blackstone candle pillar  set

PKD-21-165-Blackstone-Candle-Pillars-Set_LRG

Bowl fillers and accents

Multicolored rag ball set

20-214-Lg-Multi-Colored-Fabric-Rag-Balls-Set_LRG

Red fabric stars, assorted sizes

23-496R-Red-Fabric-Ast-Stars-Set_LRG

Wall clocks

Black mantle clock

GM76B-Black-Mantel-Clock_LRG

Primitive Star wall clock

8W1151-Primitive-Star-Wall-Clock_LRG

Country throw blankets

Stratton woven

VHC-17994-Stratton-Woven-Jacquard-Throw-LRG

Lemon Pepper

PKD-619-22-Lemon-Pepper-Throw-Blanket-LRG

Wood River

PKD-474-22-Wood-River-Throw-Blanket-LRG

Decorative pillows

Love you to the moon and back

HAM-E15416-Moon-and-Back-Pillow-LRG

The best antiques are old friends

PKD-75-003-Best-Antiques-Pillow-LRG

Wall decor

Country wall baskets

E6377-Long-Wall-Baskets_LRG

Happy birthday wall calendar

HRS-32984-Happy-Birthday-Calendar-LRG

Chalkboards, various styles and sizes!

HAM-E15870-Small-Hanging-Chalkboard-Set-LRG

And don’t forget you have a few more days to take advantage of Labor Day savings– 10% off everything in the store! See site for details. Sale ends 9/7/15.labor day sale

Refinish or Replace: Which Is Right for Your Hardwood Floors?

Buy Hardwood Flooring | Discount Wood Floors

When it comes to refurbishing your floors, the decision to refinish or replace can be difficult. Refinishing is a technique that allows you to save your current wood flooring, but you don’t get the opportunity to have a clean slate. On the other hand, replacing your hardwood floors gives you a brand new start and fresh flooring for your home. Choosing between these two options may be difficult, but the following guide contains information that can help you make a decision.

buy hardwood flooring

The first step in deciding to refinish or replace your flooring is gauging the repairs. Sometimes making this decision comes down to how badly your floors need repairs. Minor repairs, such as stains or damaged planks, can be an easy fix, which doesn’t demand an entire replacement. However, floors with rotting or structural problems will require a lot of work, which may cost more than replacing the floors altogether.

Another step you should take in making the decision to refinish or replace is checking your budget. Choosing between the two options can come down to something as simple as cost. Refinishing floors tends to be less expensive than a total replacement, but there are some situations where this circumstance can be reversed. Determining your budget can help you decide if a refinish or replacement is best for your needs.

Finally, establish the age of your flooring. The older the floors, the more valuable they can be in your home. However, the older the floors, the more likely they are to have damage or mismatch the interior of a home. When you establish the age of your flooring you can better understand its value and aesthetic appearance in your home, which can lead to a decision in the refinish versus replacement debate.

If you decide that a flooring replacement is best for your home, consider flooring.org. Our extensive selection of unfinished flooring, prefinished flooring, parquet flooring and more can be right at home in your home. For more details on what we have to offer, give us a call at 1-800-689-9006.

What is WPC Flooring?

WPC refers to “wood plastic composite” but oddly enough, there are very few WPC floors that contain any wood at all!

So what is all the hype about this fastest growing segment of the flooring industry? The short answer is these floors perform like laminate flooring, install quickly and easily like laminate flooring (no nails or glue), and are waterproof.

WPC can go over most subfloors without much preparation.

WPC floors refer to a category of Luxury Vinyl Plank and Luxury Vinyl Tile (LVT and LVP) that are rigid. Ordinary LVT/LVP flooring is constructed of 100% virgin vinyl but does not have the rigid thermoplastic core material of WPC floors.  This rigid core material of WPC is beneficial when the existing subfloor has imperfections, so it cuts down the time and cost of subfloor preparation during installation. If a subfloor is not sufficiently smooth for ordinary LVT/LVP flooring, the imperfections could telegraph through the vinyl over time. So the bottom line difference between WPC and LVP is the ability of the rigid core to hide more subfloor imperfections.

The big advantage for WPC over laminate is that it is waterproof.

Plus the vinyl wear layer of WPC absorbs the impact sounds to make it inherently quieter than laminate (a good sound control underlayment for laminate will mitigate this difference)

Pictured is the white thermoplastic core of Mohawk’s SolidTech

So what about the most important characteristic – looks, visual realism and authenticity compared to hardwood?

WPC floors are very good and will be rapidly improving over time. But the higher end and more mature laminate flooring brands which have unique characteristics like big beveled edges and extremely realistic in-register embossing (when the surface texture follows the relief and the grain of the wood), are in our opinion, a step ahead in visual realism at this time.

You can find many new WPC floors in our Vinyl Flooring section.


Wall Art Alternative: How To Frame Vintage Clothing

(Image credit: Ashley Poskin)

Framing a garment can seem like an intimidating process, but it’s actually quite easy to do yourself. The framing pros have a lot of specialized tools and tricks (like using a tagging gun instead of hand stitching, for instance), but for us weekend warriors, it’s all about using simple tools and getting the job done so we can enjoy our completed gallery wall that much sooner. So grab your grandpa’s letter sweater or your grannies floral girdle and get to framing!

READ MORE »

How To Polish Your Bathroom Faucets

The biggest difference between faucets in a showroom and faucets in daily household use comes down to one simple word: Shine. While most sink faucets start shiny and beautiful, over time they tend to grow dull and dirty. People are constantly washing their hands, soap is splashing onto the faucet head, and stains and water spots accumulate, taking away the faucet’s original luster. Has this happened to your bathtub/shower faucet or your sink faucet? Have you noticed a general dinginess around the faucets in your bathroom space? If so, here’s what you need to know about bathroom faucets and how to keep them looking like new.

How to Know If Your Faucet Needs Polishing

A clean faucet is a shining, streak-free faucet. When you notice an accumulation of spots and stains building on your bathroom faucet, you know it’s time to do something. This is true whether your faucet is made of glass, porcelain, chrome, brass or another material.

Benefits of Polished Faucets

It’s not hard to see the advantages that come from a clean bathroom, whether you’re talking about spotless floors or sparkling faucets. Regardless though, here’s a breakdown of some of the specific benefits to expect when you keep your faucets polished:

  • Like-new feeling. It’s as true of faucets as it is of automobiles — the better their condition, the newer and more valuable they look.
  • Overall sense of cleanliness. Creating a clean bathroom feel requires every component to be tidy, from the countertops to the sink faucet. Water spots on the faucet won’t work.
  • More of a wow factor. In terms of creating a strong first impression to guests and visitors, a sparkling faucet goes a long way. Keeping it clean and polished turns it into more of a showpiece.

Tips for Polishing Your Bathroom Faucet

To polish a faucet, you’ll need a simple list of tools: cleaning cloths, soap, vinegar, water and perhaps an old toothbrush. Additionally, here are some tips and tools that can be useful to remember:

  • Pull from the liquor cabinet. Believe it or not, vodka can be a great cleaning tool, at least when it comes to bathroom faucets. Soak a cleaning cloth in the alcohol and use it to polish glass, porcelain or chrome fixtures.
  • Try an acidic medium on soap spots. Basic white vinegar can be effective at removing soap scum and water spots. Similarly, lemon juice can help get rid of these tricky scum marks.
  • Apply oil to the clean faucet. Once the faucet shines again, rub some baby oil on it to ward off new spots and add a sparkling finish.
  • Avoid scouring pads. Abrasive cleaning tools might work well on kitchen pans, but they should stay far away from your bathroom faucets. Because abrasive cleansers can damage and scratch the faucet’s finish, avoid them, using cloths and old toothbrushes instead.
  • For brass faucets, dry and gentle is key. To get rid of spots and scum on brass faucets, stick to a damp cloth or a cloth dipped in warm, soapy water. Using anything more abrasive can damage the fixture. Likewise, once the faucet is clean, dry it thoroughly. You may even want to keep a cloth in the bathroom to regularly wipe the faucet after use, preventing new water stains from forming.

To make your sink faucets beautiful, use the tips above to stay on track. Also, when you’re looking for new bathroom faucets, come to Modern Bathroom. We’re proud to offer a wide range of features and fixtures to outfit any style of bathroom.

Five Stencil Projects To Brighten A Crafty Office

Cutting Edge Stencils shares ideas to help brighten an office or craft space! http://www.cuttingedgestencils.com/wall-stencils-stencil-designs.html

Cutting Edge Stencils Shares Stenciled Office Ideas!

Good Morning, my DIY office organizers!  The New Year has just kicked off and already you’re in complete organization mode.  Now we know on the top of that organization list is your home office.  After all it’s a room where you get things done, whether you use that space for traditional business purposes or crafting projects.  Just because you’re putting it into tip-top organization shape, doesn’t mean it needs to lack color and personality.  Cutting Edge Stencils is here to help you brighten that crafty office of yours using our stencils.  Our ideas are easy and inexpensive, so let’s take a look…

Brighten Up A Crafty Office Using Stencils

Cutting Edge Stencils shares ideas to help brighten an office or craft space! http://www.cuttingedgestencils.com/wall-stencils-stencil-designs.html

Stencil An Accent WallThis might be the obvious makeover solution to freshen up your office space because a pretty pattern can drastically change its look.  Creative DIYer and design enthusiast, Erin from the blog Suburban Bitches, stenciled a glittery gold pattern in her combination craft-room/office.    Erin painted the wall in Benjamin Moore’s Decorators Gray and then painted the sparkly Zagora Allover pattern using a color similar to Martha Stewart Living Metallic Paint in Golden Pearl.  It looks so pretty, we’re not sure if we’d get any work done here!

A Zagora Allover Stenciled office.  http://www.cuttingedgestencils.com/trellis-allover-stencil.html

Stencil the Desk:  A plain white desk may gleam with organization but it also screams boring.  Take the lead from the DIY craft queen, Mandy, from Sugar Bee Crafts.  Mandy’s husband built her this custom white desk to fit her needs and her space.  She promptly added our Funky Wheel Wall Stencil in an eye-catching turquoise hue.  Do you love it or do you love it?

A stenciled craft desk using the Funky Wheel pattern from Cutting Edge Stencils. http://www.cuttingedgestencils.com/funky-wall-stencils.html

Stencil The File Organizers: Filing will become your new favorite task with stenciled file holders like these! Our creative fan, Jennifer, decided to reinvent her organization system for the New Year.  She bought some baskets for $4 and then revamped them with craft paint and our Casablanca Craft Stencil and Nagoya Craft Stencil.  We love the patterned pizazz these items add to her traditional desk!

DIY stenciled desk organization using the Casablanca and Nagoy stencil patterns. http://www.cuttingedgestencils.com/craft-furniture-stencil.html

Stencil The Memo Board: Tomorrow’s to-do list will thank you once it’s been pinned to this stenciled stunner.  Meet Heidi, the crafter behind Sew Craft Create.  She put together this adorable magnetic memo and cork board combo using our Turkish Tulip Stencil and in teal blue hue.  For the how-to, check out her post here.

Stencil your memo and corkboard using the Turkish Tulip pattern from Cutting Edge Stencils. http://www.cuttingedgestencils.com/turkish-tulip-craft-stencil.html

Stencil A Laptop:  Do you have  a boring black laptop staring back at you right now?  Let’s give it a colorful whirl!  That’s exactly what our uber clever pal Kimbo, from A Girl and A Glue Gun, did.  She traced our Acacia Allover Stencil on some vinyl and then stuck it onto her laptop to give it a fun, bright, and unique look.  Learn how to give your laptop a makeover from her DIY Club tutorial.

A stenciled laptop using the Acacia Allover pattern from Cutting Edge Stencils. http://www.cuttingedgestencils.com/leaf_stencil.html

We hope you enjoyed our easy and inexpensive stencil ideas to brighten up your office space.

Which one of these office projects are you most likely to complete?  We’d love to read your comments in the section below!

Still looking for more stenciling fun?

  • Enter our $50 stencil giveaways at Decor Adventures!
  • Shop our stencil designs and find the perfect stencil for your project!
  • Follow us on Pinterest to see awesome inspirational photos!
  • Have you completed a stencil project? Come share it on Facebook!

Thanks for reading, and good luck stenciling!
Michelle and the Cutting Edge Stencils Crew

Distressing then Waxing OR Waxing then Distressing?


Waxing and distressing question. I normally paint, distressed then wax. I noticed many people say they distress and sand after waxing. So last night I waxed, buffed this morning and I am now distressing. The paint is already really hard and I find it harder to sand and distress but there is much less dust which I think is why people do this. Thoughts? Do you distress before or after waxing? -Jacqueline from Chicago

This is a great question and one that comes up often enough.

Let’s start by defining furniture distressing because it often gets confused with “antiquing” or “dark-waxing.”

Both distressing and waxing are techniques that can be used to replicate the patina of old furniture. Distressing is the act of wearing down the paint finish so that the substrate of the original finish peeks through. Typically, you would use sandpaper to distress a piece.

Record Cabinet, Blue-6

Louis Blue, Greek Blue and Pure White Chalk Paint® with the edges lightly distressed

When someone wishes to “antique,” a piece they are typically looking to add dark wax to give an aged patina that has a rich depth of color among the finish.

Dresser, Old Ochre, Versailles-24

Lightly distressed edges WITH a dark wax finish to add an antiqued patina

So, do you distress BEFORE OR AFTER you wax?

Let’s review the Annie Sloan method!

Annie paints.
Annie waxes.
THEN Annie distresses.
Finally Annie re-waxes where she distressed.

How do I know this, you ask? First of all, I’ve been trained in the Annie Sloan method. Second of all, it’s in her book!!!

Quick and Easy

You can read all about how Annie distresses on pages 12-50 using a variety of methods

So, let’s talk about the advantages of distressing after you wax.

  1. It is a much cleaner process! Wax tends to hold in the dust from the sanding itself keeping an extremely limited amount of free-floating particulates in the air that would otherwise be all over the place if you distressed before you waxed.Table, Florence-2
  2. You have much more control over your distressing by doing it after you wax. Annie Sloan Paint is VERY EASY to work off. I’ve seen and heard of people who have distressed their pieces before they waxed and lamented that “too much paint came off.” When distressing after you wax, you can be much more intentional about taking off just the right amount of paint in the right places without over-doing it.PaintClass-32
  3. You have a consistent finish when distressing after you wax. Meaning, when you distress before you apply the wax, the sand paper is not only removing paint along the edges, but also smoothing out the paint finish around the distressed area. The result is an irregular paint finish that is smooth in some places and more textured in others (as a result of brush strokes). When the wax is applied and then polished off, those distressed edges will have a higher sheen than the rest of the piece. Whereas, if you distress after you wax, the end result will be less varied.Table, Florence-11

When you distress your furniture after you apply your initial coat of wax, you don’t want to wait a day or two to do so. You will have an easier time of it if you distress immediately after you paint and wax…before the paint has had a chance to thoroughly dry and begin its curing process. Distressing AFTER you wax doesn’t have to be cumbersome or “hard.” If you wait too long to distress your piece, you will have to work much harder to remove the paint.

Piano, Mint-51

Now…of course, there are other ways to do it! When I teach a workshop, we talk about wet distressing, how to distress using nothing more than a wax brush and some water, the benefits of distressing with an electric sander, course sandpaper versus fine sandpaper…and so on. You will gain an appreciation for the many varied techniques simply by playing with the paint and wax and exploring the variations of how to create a multitude of looks! And, of course invest in Annie Sloan’s amazing books. I’ll tell you a secret…you can learn EVERYTHING we teach in a workshop just by reading her books. No Joke! I hold nothing back! Hit up your local thrift store, start stocking up on cheap chairs and side tables and become your own expert in the how’s and why’s of Annie Sloan Paint!


How To Make A Bathroom Stylish With Glass

Are you looking for a great way to create a beautiful, stylish bathroom? If so, then think about glass — one of the year’s top bathroom trends. Here is a quick look at the many stylish ways the design world is putting glass to work in the bathroom.

The Shower

If you want to decorate with glass, then the shower will be an essential part of your theme. Here are a few ways you can really take off with glass:

  • One timeless favorite is glass shower doors. Use textured glass or smooth, clear glass — either way, you’ll make a big statement.
  • The glass shower enclosure is very popular right now, particularly the clean look of a frameless enclosure.
  • Framed enclosures are another great (and lower cost) option, especially when they are designed to look like French doors and windows, or windows with transoms.
  • In more compact bathrooms, sliding enclosures will give you the same look as a glass enclosure, but since the doors slide rather than swing, you won’t need to worry about making sure there is enough room for a swinging shower door to open.
  • Glass block enclosures are incredibly versatile, letting you build a shower in any number of shapes, sizes and designs — including showers with beautifully curved glass walls.

The Bathroom Sink

There are two great ways to incorporate glass in the bathroom sink: One is to make use of glass sinks, particularly vessel sinks, which tend to resemble old-fashioned washstands.

The other way to use glass around the sink is to go with a glass countertop over an open-framed vanity. Continue the theme using a glass vessel sink on the glass counter or choose a vessel sink in a contrasting color. In some high-end bathrooms, the glass counter is even illuminated from below, which adds a pleasantly modern ambience.

Using Glass Elsewhere in the Bathroom

The shower and sink aren’t the only places you can use glass! In fact, there are tons of smaller accents that will help you create a stylish, cohesive look. Consider the following ideas:

  • Add an air of elegance by installing a cut-glass chandelier as the bathroom’s main light source.
  • Install glass shelving, whether you use smaller shelves near the sink for your necessities or larger glass-shelving units for big items like towels.
  • When it comes to mirrors, bigger is better. Not only will they enhance your glass-oriented theme, but they’ll make the room feel more expansive.
  • Put glass tile to use. Glass tile comes in a vast array of colors and styles. It works well as tiling for shower walls or as a backsplash behind the bathroom sink.
  • Don’t forget about the windows! One great way to use windows as an accent is to match them with the shower. In other words, if you have a glass block shower, then consider glass block windows, and if you have a framed enclosure that features transoms, then make sure to continue that theme with the window.

As you can see, there are many ways to get the look you want using glass fixtures and accents. Make your bathroom beautiful with glass, and this is one trend that you’ll enjoy for years to come.

The Big Election: Apartment Therapy’s Big Reveal Makeover Contest

Forget Hillary, Bernie, or Trump. The really big deal is Apartment’s Therapy’s Big Reveal Makeover Contest. See, this lucky lady made over her apartment bathroom a few months back & decided to enter it in the contest. A refresher of the budget-sized but impactful makeover:

Apartment Bathroom Makeover Before and After The Decor Guru DIY vanity sink skirt shower curtain batik windchimes fresh flowers eclectic decorating

Do you know what I could do with $1000? How far that would go at Target and IKEA? That I could buy some fantastic creation from a starving artist or a fabulous piece of furniture?

Voting ends in one week, October 28, so I need as much help as I can get. Unfortunately, AT posts new contestants each day, so those who were announced earlier on have more time to receive votes. That was not me, as I just learned I was accepted a few days ago.

That’s why I need your votes! To help a sister out, go here, log in/register, and then click the heart to “favorite” my room.

Thanks so much for your help! Together, we can do this!

Thanks for visiting! Let’s stay connected!

Filed under: Bathroom, Before & After, DIY, Rental Decorating, Reveals + Makeovers