Paint a Fall Harvest sign and how to paint lettering is a simple, step-by-step tutorial on painting DIY indications No cutting machines are required. Create lots of customized indications on a budget plan.
How to paint a Fall Harvest sign without having to own a cutting maker. You can learn to paint letters by hand making it simpler and more affordable to create custom-made indications for yourself or others. This indication is for Fall but this technique works for any wording.
Harvest Indication Paint Products
These are the paints and colors I use however you can use what you have. Craft acrylics will work fantastic for this indication 5 foot long 1 \u2033 x 12 \u2033 pine board DecoArt Chalky Complete paint in Heritage Donna Dewberry 3/4 \u2033 brush and script liner DecoArt Americana bottled acrylic in Buttermilk ( white is fine too ) White Graphite Paper er Loew Cornell White Nylon Brush Set er paper I printed the lettering out on routine printer paper after producing them in Word.Basecoat the Wood
I stain, crackle and paint the 5 foot long brand-new pine 1 \u2033 x 12 \u2033 and let it dry, then set out my lettering CLICK HERE to learn how to utilize crackle medium.
Transfer the pattern
When I have it laid out I slide the white graphite paper under it and start moving the lines. Note the white graphite paper peeking out at the bottom of the photo. As you can see it has been utilized before, graphite paper can be reused various times making it very cost-effective. Related: How to Transfer Patterns for Painting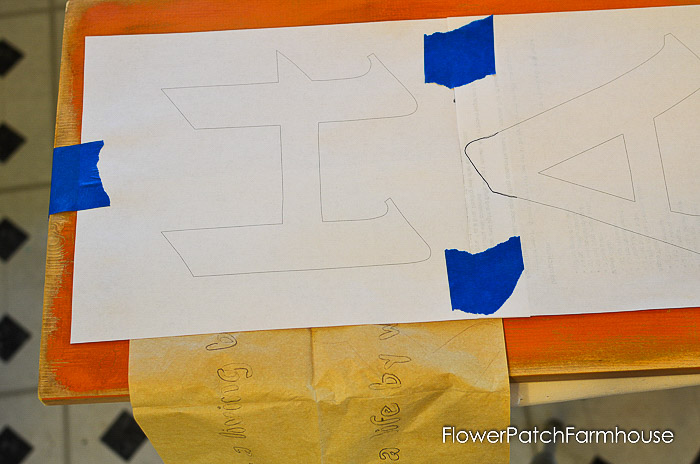

Overview lettering with Liner Brush
To get a nice edge on the letters describing with a liner brush is practical. You can avoid this and simply paint with a flat brush however using a liner is simpler for me to get the corners crisper. You may require to water the paint down a touch to get it to flow well from the brush
Paint Fall Harvest Sign Lettering
Complete with a flat brush. Utilize the size flat brush you are most comfortable with for the size of the lettering.
Add Details
When the lettering was painted I returned in and added some fly specking. It just offers your sign a little stressful and texture for a more rustic look. To do that I basically thin down some charred umber paint and rub an old damp tooth brush in it, then I rub my thumbnail along the bristles while trying to direct the speckles. When the speckling is all dry lightly sand the lettering to distress it much more.
Prep Time10 minutes
Active Time30 minutes
Additional Time5 minutes
Overall Time45 minutes
ProblemEasy
Products
- These are the paints and colors I use but you can use what you have. Craft acrylics will work great for this sign.
- 5 foot long 1″ x 12″ pine board
- DecoArt Chalky Finish paint in Heritage
- DecoArt Americana bottled acrylic in Buttermilk (white is fine too)
- White Graphite Paper
- er
- Loew Cornell White Nylon Brush Set
Tools
- Donna Dewberry 3/4″ brush and script liner
- er and paper
- Loew Cornell White Nylon brush 2 inch
Guidelines
- Basecoat the wood
- Include a crackle medium and paint next layer
- Distress with various approaches to develop old barnwood look
- Transfer style
- Outline lettering with liner brush and paint
- Fill out lettering with flat paint brush
- Fly speck or spatter with toothbrush and watered down paint
- Distress more with sandpaper
- Seal with outside varathane for many years of pleasure
- Decorate your deck or home for Fall using your new do it yourself indication
Recommended Products
As an Amazon Associate and member of other affiliate programs, I earn from qualifying purchases.


