Making indoor Christmas decorations can be something fun for you to do on your own, or something fun to do as a group. Whether you are looking to make completely new decorations for the entire home, or if you just want a little something new this year, there are many ideas that you have to choose from – create some Crazy Garland, an easy-to-make Christmas throw pillow, and a Candy Cane Candle Holder.
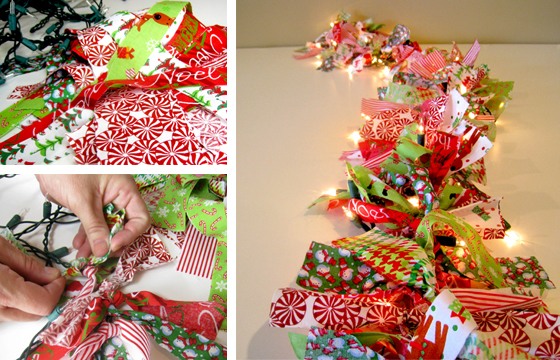
Crazy Pre-Lit Garland
What you need:
- A strand of white Christmas lights
- Lots of different Christmas ribbons and fabric
- Scissors
Begin by cutting strips of fabric in varying widths between 1/2″ and 2″. Cut the ribbons and strips of fabric into pieces that are anywhere between 5″ and 10″ long. Begin to tie the pieces of fabric and ribbon onto the strand of lights with a single knot. Tie them as close together or far away from each other as you prefer. Do this for the entire length of the strand of lights and you are finished! This crazy garland will add a little character wrapped around the stair railing, around the kids’ bedroom door, or simply strung around the Christmas tree.
Homemade Christmas Throw Pillows
What you need:
- Throw pillows from your couch
- Red and/or green Christmas fabric
- Sewing machine
- Scissors
- Thread
- Sewing needle
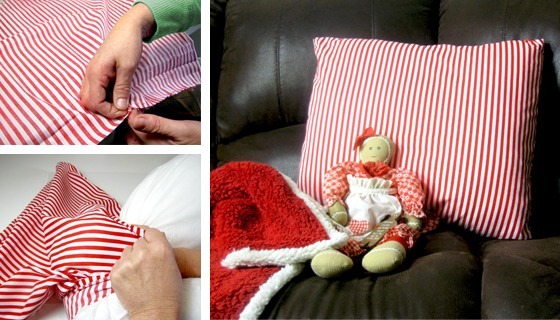
Christmas throw pillows can be expensive. And, after Christmas is over, you have to figure out where you’re going to store them – after all, they’re lumpy and awkward so they won’t fit just anywhere. Here’s how to take your existing throw pillows and transform them into a fun, Christmas decoration with just a little fabric and some light sewing. And, when Christmas is over, you can flatten out the covers and store them along with your other Christmas linens. Here are 5 easy steps to creating your own Christmas throw pillow.
- Measure the size of the pillow and cut out two pieces of fabric that are the same size as the pillow plus 1″ on both the height and width.
- With right sides together, sew the two pieces of fabric together with a 1/2″ seam. Leave a 5″ opening on the bottom for smaller pillows, and a 10″ opening for larger pillows.
- Turn the covers right-side-out and push out the corners with your finger.
- Shove one pillow into each cover and sew the opening shut with a slip stitch.
That’s it! Toss the pillows on the couch and move on to your next Christmas craft project. When Christmas is over, simply cut open the covers at the slip stitching, and pull the throw pillows out. To use them again the next year, simply shove the pillows back in and slip stitch it shut again.
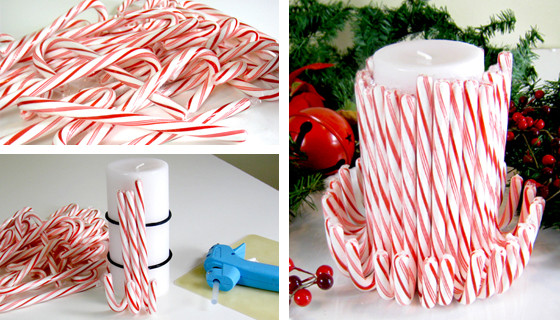
Candy Cane Candle Holder
What you need:
- 1 pillar candle
- Candy canes
- 2 Hair bands (yes, hair bands)
- Hot glue
Wrap 1 hair band close to the bottom of the candle and one hair band toward the top of the candle. Add a spot of hot glue onto each of the hair bands and attach a candy cane (the glue will stick better on wrapped candy canes) with the curved part toward the bottom facing upwards. Repeat the process all the way around the candle – make sure the candy canes are attached as close together as possible. That’s it!
Framed Songs
What you need:
- An 8×10 frame
- Christmas red acrylic paint
- Sandpaper
- A paintbrush
- Spray-on craft varnish
- A small frame easel
Begin by typing up the words to your favorite Christmas song. You want it to fit in an 8″x10″ area on your sheet, so you may want to consider only typing up the chorus or a favorite verse, rather than the whole song. Align the text so that it is center-justified. Change the font on each row to different sizes, different font styles, and different Christmas colors such as red, green, silver, and gold. Print it out on an 8 1/2″x11″ sheet of paper and trim down the sides so that it will fit in an 8″x10″ frame. Tip: if there is a faux picture already in the frame (you know, like the one of the happy couples on the beach that’s in every frame), take it out of the frame and use its size as a template for your photo.
If you were able to find a frame in Christmas red, you can assemble the project. If not, you will need to remove the glass and paint the frame with the acrylic paint. When it is dry, sand it to give it a distressed look. Spray the painted frame with spray-on craft varnish. When it is completely dry, replace the glass, insert the printed song, and secure the back of the frame. Display it on an easel so everyone can enjoy it. Note: If your holiday decor does not have red in it, you can change the paint on the frame to gold, green, etc.
| Here are some ideas to help get you started. Click on the image to download the graphic, print it out and cut it to size. | |||
 |
 |
 |
 |

Article source: https://www.improvementscatalog.com/RoomForImprovements/homemade-indoor-christmas-decorations/
