DIY Home Decor Categories

How To Decorate Small Spaces for Christmas (And Make Them Cozy)

Decorating for small spaces, let alone for Christmas, has its challenges because you have a limited amount of space. After all, where should you put your Christmas tree? And should you get a live tree or pre-lit artificial Christmas tree? If you live in a studio apartment, you most likely have an open floor plan…

10 Trendy Design Ideas You Might Have Missed This Week

Mitchell Parker, Houzz Bathroom 1. Towel bars. Great design is about solving a dilemma, no matter how small. Not having a towel bar or hook right next to the shower creates a frustrating scenario that often ends in water all over the bathroom floor. Professional decorator and Houzz contributor Jess McBride put together a great…

7 Bathrooms That Prove You Can Fit It All Into 100 Square Feet

Mitchell Parker, Houzz If you want a bathroom with a stand-alone bathtub, separate shower, double vanity and toilet or water closet, you’re looking at 100 square feet, give or take. That figure is based on the standard dimensions of each of those elements, plus the space you’ll need for meeting code requirements and moving through…

Tips for How to Hang Christmas Tree Lights

Decorating for the holidays may be something you enjoy, or it may be a chore. Either way, knowing how to hang Christmas tree lights will make your job a little less stressful and should help it go a lot quicker as well. Whether you are a Christmas decorating professional, or if this is the first…

Mantel Decorating Ideas: How to Fake a Christmas Mantel

Do you admire your family and friends fireplace mantels? If you don’t have one, seeing their charming Christmas mantels could make you blue. Well, get a load of this: you can fake one with our mantel decorating ideas. These faux fixes will brighten your space and give you the holiday look you want. Keep reading to…

Dress Your Home to Impress with These Outside Christmas Decorations

Decorated to celebrate the spirit of Christmas, we’re giving you inspired looks with outside Christmas decorations for your home. Lifelike Christmas greenery dresses up the snowy entryway, while Christmas ornaments and gifts add to the wonder of the season. Angels with doves and a family of deer along with a snowman and soldier stand tall and…

Christmas Decorating Ideas for Small Spaces: How to Display Ornaments

If your home or living space is too small for a Christmas tree, or if you’re just looking to liven up a small area, we have some festive ideas for you. After all, no home is too small to fill up with Christmas cheer. Check out these Christmas decorating ideas for small spaces and get some…

Ultra Modern Villa Detailing Design Ideas Hybrid Architecture

27 Sep This modern home design has unique form. This villa has geometries choreographically shape structure with unusual detailing building accent, sculptural style architecture in modern atmosphere. A hybrid concept, isn’t it?. Surrounding with natural landscape make this modern villa protected and like escape from a crowd. Privacy can be determine from its angular shape…

8 Ways To Carve Out Space In A Small Bedroom

Aditi Sharma Maheshwari, Houzz A shoebox-size bedroom can still be an inviting, multifunctional and utterly chic yet homey space. With the right storage hacks, clever decor staples and a smart color palette, it can serve you well while seeming larger than it is. Here’s how. 1. Reduce clutter. The foremost strategy for making a small…

Bookmark These Design Features For Your Next Project

Mitchell Parker, Houzz 1. Fish-scale-patterned backsplash. Here’s a feature that’s popping up a lot lately: fish-scale-patterned backsplashes. The look is a big departure from subway tile, offering more movement and playfulness, but still has a certain elegance and a classic feel. 2. Dedicated storage. If you’ve got a collection, nothing beats custom storage dedicated to…

New Houzz Study Shows What’s Trending In Master Bathroom Remodels

Erin Carlyle, Houzz If you’re considering remodeling your master bathroom, which features do you most want to upgrade? If you’re like a large contingent of renovating homeowners who shared their priorities with Houzz recently, your shower area may top the list. Showers are a popular feature to change: The survey found that 81 percent of…

DIY Shabby Chic Bedroom Ideas

We are interested to find your taste and therefore we make some cozy motivations to embellish your home with shabby chic delights which charge a little and provide long and lasting feel of happiness. Now we are with some of ingenious and formative styled up modifications through DIY shabby chic bedroom ideas to change the tone of your bedroom into shabby chic fashion.

Here are some shabby chic bed’s ideas that yield an overwhelming and mind-boggling impact and compelled your inner to do so to have that lovely feel in your bedroom. The antique and distressed wooden factor is mixed with chic and friendly bedroom theme in plenty of significant ways like in form of shabby headboards, old aged wooden name plates on bedroom wall and in shape of wall art and paintings. The pallet wood is the best option for shabby mode of furniture and wall art.

distressed bedroom idea

shabby chic bedroom plan

shabby chic bedroom suggestion

shabby chic bedroom inspiration

shabby chic bedroom motivation

diy shabby chic bedroom idea

How to retile a bathroom

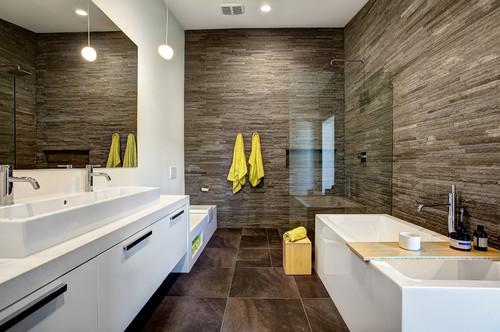
Retiling your bathroom can give the space a bright new look, which is perfect if you’re sick of discolored tiles and mildew. However, you don’t necessarily need to get a pro in to do it. It can be a little tedious and repetitive, but if you’re careful, you can be left with a luxurious bathroom that you really love. Here’s how to retile your bathroom to get the bright look you’re hoping for:


Get The Right Tools Together

Make sure you have absolutely everything you need before you get started. They are as follows:

●     Plastic sheeting to protect your bathroom

●     Your chosen tiles

●     Thin set adhesive

●     Sandpaper

●     Wet saw (you can rent one if you don’t own one)

●     Safety glasses

●     Notch trowel

●     Bucket of water

●     Sponge

●     Rags

●     Flathead screwdriver

●     Level

●     Rubber mallet

●     ⅛ spacers

●     Sharpie to mark your cuts

●     Measuring tape


Prep Your Area

Make sure your area is prepped before you begin. Level a wall with patches of of thin set adhesive if you need to. Scrape off loose paper or paint, or lightly sand glossy walls. Remove outlet plates and switches before you begin. The wall should be clean and dry before you get started.


Measuring

Getting your measurements right the first time around will save you a lot of hassle. You don’t want to have to start something all over again! Measure carefully around your windows, corners, and outlets before you begin.


Plan Your Wall

You need to plan your wall with the pattern you want before you start. You should try to avoid awkward slivers of tile along the wall if you can. Practice dry laying the tiles on the floor to get an idea of what you want it to look like. You should also do this if you’re retiling the floor. Use spacers in your layout to get an accurate idea of what it’ll look like. Continue to reposition your tiles until you find the best lay out. It’s now time to mark your layout on the wall. Sometimes the edge of the floor can be crooked, so use a level as your guide.


Using Your Adhesive

Mix up your thinset with the instructions, ideally it shouldn’t be too wet or too dry – the consistency of peanut butter is perfect. Your tiles won’t stick properly if it’s too dry, or they will droop if it’s too wet. Only use as much adhesive on the wall as you can apply tiles to in 5-10 minutes. Some thinset dries really quickly. Creating grooves in your thinset with a trowel will remove excess adhesive, and will keep the tile stuck to the wall more effectively thanks to the suction. Double check all tiles to ensure they are level. Remember that it’s better to clean off excess thinset when it’s wet with a screwdriver and sponge than to chip it off later. Once your adhesive gets too thick and dry, make sure you make a new batch. If you just add more water it won’t be as sticky as it should be. One batch may only last 30 minutes! Really wiggle and press your tile onto the adhesive to ensure it’s stuck too. The thinset must then be left to cure for 24 hours, so no showering.